How to Make a Custom Cut Paper Card If You Are Short On Time
The RISD Alumni Association coordinates a mailable art exchange each year, and I participated for the first time. I’m going to walk you through my process!
One of my goals for 2025 is to be less busy. I’m failing miserably at that. I noted this when I signed up for the art exchange. I don’t know what’s wrong with me.
From the start, I knew I wanted to make a cut paper card. Every three years or so I wonder if I should buy a Cricut. This project sparked one of those moments, but I defeated thoughts of the Cricut yet again. I stumbled into a few shortcuts that let me make something that I hope will be nice to receive, but that didn’t suck up a whole weekend.
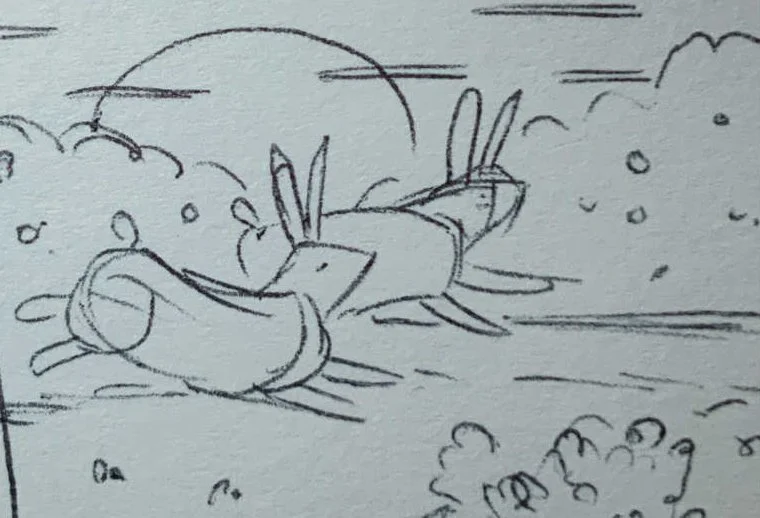
This was the winning sketch. Honestly, I wasn’t settled on if this was a sunset or sunrise until I started working in color and decided that the sun was actually a moon. The part of my brain that sketches does a truly terrible job of communicating details for the next phase of the project. Somebody should file a complaint.

There’s a lot of excess around the edges because I planned it with a bleed. Am I going to add a version of this to my licensing portfolio? You bet.
One of my creative directors (my four-year-old) suggested “bunnies” for the card theme, and why not? They’re a Valentines-apropos symbol of fecundity and jeez are they cute. So I made a page of sketches until I landed on one that didn’t feel too sappy. To streamline things, I worked the colors digitally. In Procreate I snapped a photo of the sketch and got to work. Easy: each digital layer will be a cut paper layer.
Then I’ll just…buy a bunch of paper? I’ve decluttered hard and that feels counterproductive. Ah! I’ll grab some watercolor paper and paint sections in the colors I need, then print the outlines and use those as a guide to cut the watercolor paper. Ugh, crumbs, that’s going to take forever.
AHA! I’ll just print the digital file layers and cut those out. The colors will also be just right. Lauren, you genius.

I moved the layers around onto two 8.5”x11” layouts to print at least a bit economically. Note that I chickened out of hand-cutting every tiny star.

Everything got placed once before I started gluing to make sure I understood where things overlap. Despite this, I forgot a few times where things overlap.
With the print-outs in hand, I prepared for a whole lot of X-Acto work. I got the cutting done in under an hour because I was able to focus. My husband shares my studio space when he works from home. “Do you mind some noise if I watch recorded meetings?” he asks. “Don’t you own headphones?” I gently prompt. “No,” he answers without thinking. “Are you lying to me or do you not realize you own headphones?” I ask with as neutral a voice as possible. “Oh. I guess I can go get those headphones I have for my iPad,” he realizes for his own health and safety.

Because this is a print-out, the ink sits on the top layer of material. As you can see, anything not cut 100% straight leaves a visible white edge of the paper below. I used colored pencils to touch some of the edges up.

Even though I’d finished the design only the day before and this is quite a simple composition, I had to check against the digital layers to ensure everything gets put in the right place. Work with the brain you have, not the brain you want.
For the most part, I’m pleased with the cutouts. Ideally I’d have used paper that’s dyed all the way through, but in the interest of frugality and environmentalism I’m using up the really unnecessary paper samples that Canon insists on sending me when I order ink. They make it really hard to toggle that offer off. In the past few orders I’ve remembered to un-check that option, but I’m still working through three old sample packs.

My plant tweezers got recruited to hold tiny pieces while gluing the detail work.
The eagle-eyed among you may notice that there were drifts of flower petals whooshing by the bunnies in my digital version. With the depth and texture of the paper, they didn’t feel necessary in the physical version. There’s plenty of interest! Or was I lazing my way out of cutting and gluing a ton of fiddly petals? You may have also noticed that I didn’t even print the petals layer, as if this were planned laziness.

OK, the petals were worth adding
They say art is finished when nothing can be added and nothing can be taken away. I struggled through a spiral of internal conflict. I wrote most of this post. Then I got working on the petals.
Voilà ! This was a nice excuse to do something fun.
Lauren